Providing users with a free and easy-to-use platform to create, share, and also print their latest project has made Canva an extremely popular choice. We’ve noticed that a lot of the files we receive now are created there, so we want to share some brief step-by-step instructions on how to properly create a print-ready file using Canva.
Following these steps will help ensure that you’re happy with the finished product you receive from us.
Desktop and mobile versions vary slightly in where the file menu and download button are, but the procedure is the same.
Step 1: Log in to Canva and open your working file, choose a template, or start from scratch choosing the “Custom Size” button on the home page. Ensure that your artboard is set to the finished size you require. Setting your size using inches is always best practice when the end result is a physically printed item, as the printing industry typically uses the imperial system for measuring length. From there you can click “Create new design” and you will be taken to your artboard.
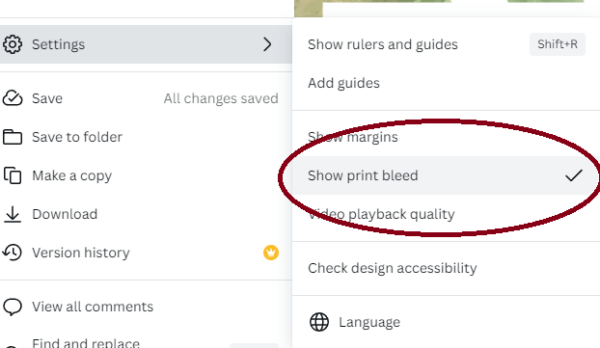
Step 2: Once you reach the page with your artboard, go to “File” then “View Settings” and click to enable “Show Print Bleeds”(Screenshot below). You will now notice that your artboard is slightly larger, with a dotted line set slightly inside. This dotted line indicates the finished size you selected.

Step 3: Design your file. Any background colours/graphics/images that you want to reach the edge of your finished product must be extended to reach beyond the dotted line, to the edge of the artboard. This is an extremely important part of this instructions list, as it ensures you do not get any white slivers around the edges of your products when we trim them down to size. (Screenshot below)

*Quick notes for designing your file:
- Since the dotted line indicates where we will trim the job, make sure that any text or important images you do not want cut off are set inside that dotted line. It is best practice to leave a margin of at least 0.125″ between your text and the dotted line to ensure nothing is trimmed away.
- Any images you add to your art file should be at least 300 dpi *at the proper size* Adjusting the size of any image you add can alter the dpi, lowering its resolution quality and resulting in pixilation. Since you’ve set your artboard to the proper finished size, this will give you a better idea of how you can expect your image to look when printed. If it’s pixilated on your screen, it will be pixilated when we print it!
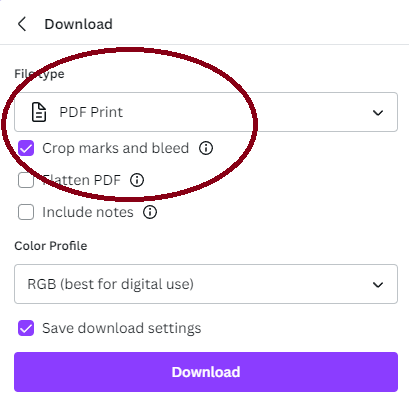
Step 4: Once your file is designed, you will click “File” again, then “Download”. Select “PDF Print” as your file type, and click to enable “Crop marks and bleed”. (Screenshot below)

Step 5 (Pro version only): When downloading your PDF Print file, you will also notice the Color Profile dropdown. From there, select CMYK.
Step 6: Click “Save download settings” so you don’t have to remember Steps 4 and 5 next time, and then hit the Download button.
Following these steps for every print job will provide you with a true print-ready PDF file, which will help ensure quality results.
As always, we’re here to help if you have any further questions on properly setting up your file. Don’t hesitate to shoot us an email at [email protected] and our friendly staff will reach out to you as soon as possible.


